
Team Blog #9

Progress for this week:

Controls Team:
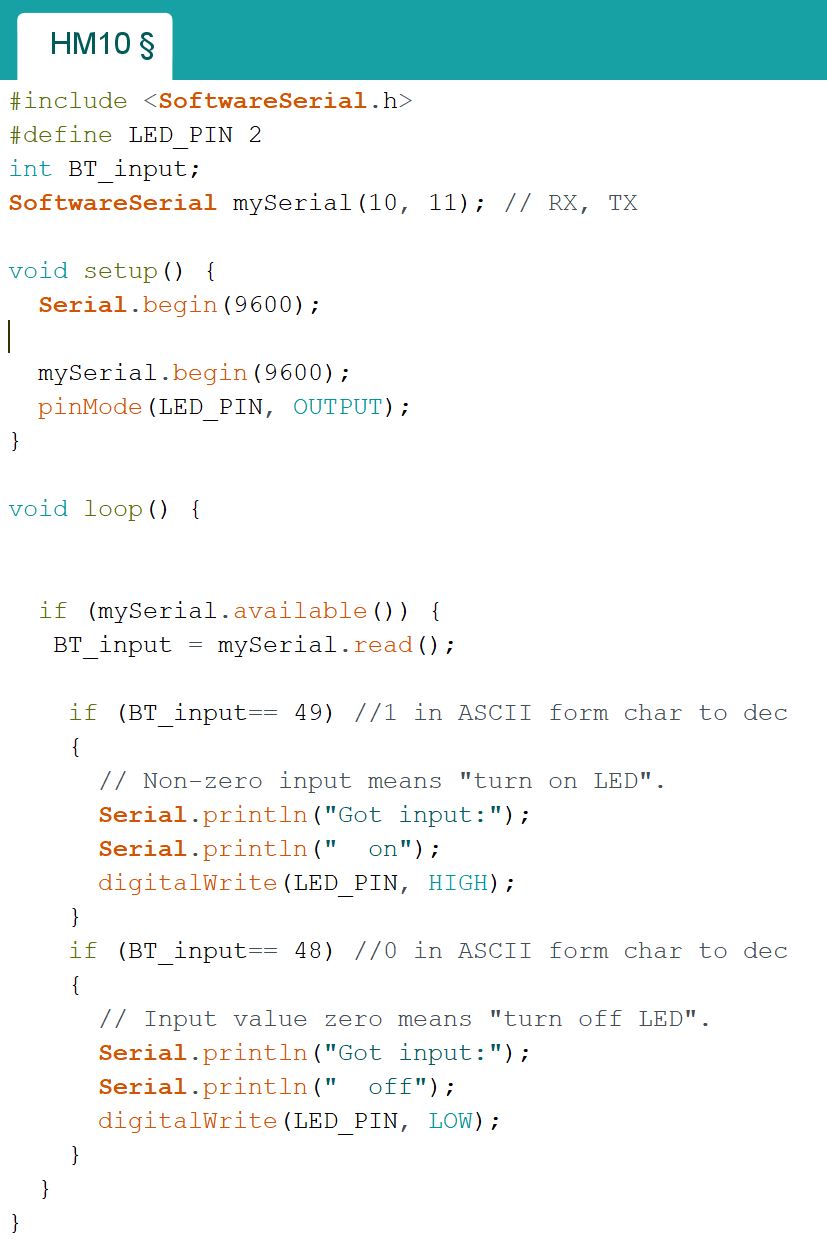
The team successfully tested the HM 10 BLE module by connecting it to the Arduino and wrote a simple code to turn an LED on and off. Using an existing App called "HM10 Bluetooth Serial Lite", we were able to connect the BLE module to the app. The app allowed us to send information by typing messages like 0 or 1. We then wrote an Arduino code to receive the signal from the BLE module and print a message to the serial monitor and turn the LED on if signal received is 1 and turns it off if zero.

Figure 1: HM 10 Arduino Code
The Guideway Team:
The Guideway Team has been modifying the CAD model of the track to implement new designs. We are adding dowel pins to have accurate alignment between the guideway pieces. 

The team as a Whole
We prepared a short presentation for the Podcar City Conference. Julio represented our team and presented the main goal of our team as well as our design choices for the track, bogie, and controls. 

Progress for this week:

The controls team is researching how to connect the HM 10 to our app. We are looking at Swift tutorials to understand how BLE works and how it can be connected to the iPhone. The Guideway team will continue modifying the CAD model of the track.

Written by:
Asmaa Darwish


Comments

Popular posts from this blog

Team Blog #15

Progress for this week: Controls Team: To become more familiar with the Pixy Cam several tests were conducted throuhgout the week. After the team decided to switch over to barcodes for the stations the team saw that this method was better. A sheet of the 10 barcodes was then printed out and the team tested how accurate the pixy cam was at ientifying the different codes. The team will is now working on trying to develop a test which will incorporate the arduino along with the other electrical componenets. Figure 1: Barcode recognition by Pixy2 Guideway Team: The guideway team made progress on determining how the track will be supported and what materials we will use to build it. The team setteled on using mdf wood with a thickness of .25". The laser cutter cuts the wood accurately and precisely at the maker space, however, the space is only available during the week days from 10am to 6pm. The supporting stands will use 3ft long zinc threaded rods with nots and washers to ...

Team Blog #25

SSST Blog 5/13/20 Progress for the week: Since this is essentially the last blog for the 2019/2020 academic year, and the last major thing that was accomplished this week was submitting the report, there is not that much individual subteam work that was completed. Rather, everyone came together to work on the final report throughout the entirety of the last week. The remainder of this blog will be dedicated to showcasing the final results through images of each of the subteams and also of the Small-Scale as a whole. Controls Team  The final design of the controls team was two separate iOS apps, one allowing to connect and to send data to BLEs to activate the master Arduino code and another solely for a pleasant and informative UI experience. Although ultimately a keyboard was not able to be implemented successfully into the BLE testing app, a slider was added so that depending on its position, different 8-bit unsigned integer values (within a range specified in Xcode) can be ...

Team Blog #19

SSST Blog 3/26/2020 Progress for this week: The Small Scale team met this week to discuss our plan moving forward with our project after the recent changes that are going on. The team decided to continue meeting online via Zoom or Google Hangout to discuss our progress. The meetings will be happening every week. This week we also met as a class with Dr. Furman. We explained our plan with him and explained our schedule that is shown below in figure 1. The schedule shows the main goals of our team for the rest of the semester. Plans for next week Next week is spring break, but the team is still planning to meet to encourage ourselves to meet the deadlines that we set. For controls, the Arduino code will implement the switching mechanism servos. By adding this, the Arduino code will be complete and ready to be used along with the iOS app. The next step for the iOS app is adding a text box that allows the user to type data that can be sent to the BLE. More thing is planned to...